
The Complete Story of How I Made a Mickey Mouse Cake (Including the Disaster Photos)
This post may contain affiliate links, read our disclosure policy.
This is supposed to be the post where I write about the total success I had over the weekend while making a Mickey Mouse cake for my son’s third birthday cake. I was ready to tell you how I conquered the art of making and using fondant.
Instead, I will tell you how evil fondant is and how it nearly ruined my night.
It all started with a dream. An inspiration cake that I thought, no problem, I can do that. (see it here). I can make a Mickey Mouse cake. My son loves Mickey Mouse Clubhouse, so I’ll make him a Mickey Mouse Clubhouse cake!
Here’s my story. (spoiler alert: I did finish the cake … see, how cute?)

I’ve include photos so you can truly appreciate my effort.
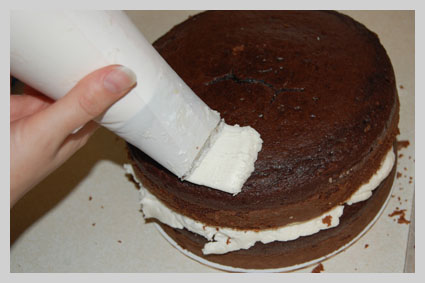
I started with the basics for a wonderful cake. Piping icing on a chocolate layer cake.
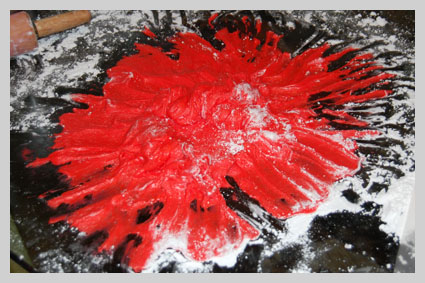
Next was the fondant, or fon-DON’T as I like to now say. I made the recipe. Colored it red. My husband helped by rolling it out. Then, he tried to pull it up to place on the cake I just made. As you can see, the fondant didn’t want to come off the table. But he tried again.
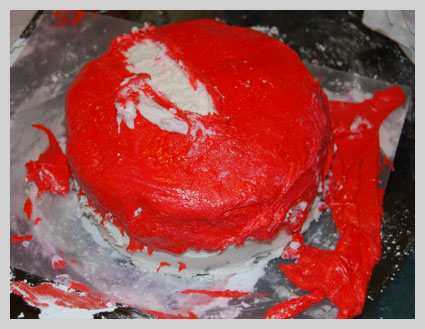
We were able to get some on the cake, but as you can see it was a total disaster. It was after midnight when the fondant disaster happened. I was depressed and exhausted. Ready to give in. I decided to call Publix in the morning and see what they could do for me. Then, inspiration struck me. I realized that my son is only three years old. His friends are all only three years old. They don’t care what the cake looks like. I could salvage the Mickey Mouse cake. Onward I went.
Mickey Mouse Cake
Here is the final Mickey Mouse cake. Not what I had envisioned, but not the disaster I was headed for either. After my midnight emotional meltdown, I put on a second layer of buttercream icing, tinted some of it blue and piped stars around the top and bottom of the cake and called it a night. Luckily, I had already purchased the Mickey Mouse Clubhouse characters to adorn the top of the birthday cake. The next day, just before the party, I purchased the pre-made letters to spell out Happy Birthday. (I didn’t have it in me to hand pipe letters so early in the morning.) The kids loved the Mickey Mouse birthday cake. They couldn’t see the imperfections. My son just remembers his “Mickey Mouse cake” with toys on top. Success, after all.
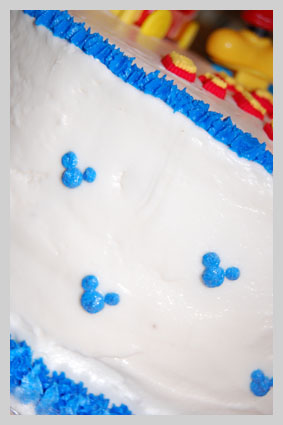
My favorite part of the cake is where I felt the most creative. On the side, I piped little blue dots in the shape of Mickey Mouse heads. It adds a personalized and creative touch that makes me feel this Mickey Mouse cake is special.
Overall, I am glad that I tried to make the birthday cake. The other night I swore I would never do this again, but I am sure I will. Next time I’ll do more planning and not try to use a technique that I haven’t practiced. But, I will try to conquer fondant again. You’ll be the first to know if I’m successful.
Related:
- See how to make chocolate covered race car pretzel favors.
- Car cake.
- My very first decorated birthday cake: A 3D duck cake.
- Rocket ship cake (with photos)
- Butterfly cake (with photos) — my favorite cake so far.
- Elmo cake (with photos) SUPER cute. My NEW favorite cake!


your cake came out great!!!!!!! and i just made a cake using fondant for the first time and it turned out great!!!!! i surprised myself!!!! so please try the fondant again. im sure you will have better luck. i used marshmallow fondant. i have been wanting to make a cake with fondant but always chickened out. i finally got the guts to do it and it came out great.
Hi! there is a recipe, is like fondant but is a dough, in spanish is better for me, i hope you found anyone who translate this
6 cucharadas de agua
1 cucharada de gelatina sin sabor ni color
1/2 taza de glucosa
2 cucharadas de glicerina
1/2 cucharadita de esencia transparente
1 kilo de azucar pulverizada
en un bowl resistente al calor colocar el agua y dejar caer en forma de lluvia la gelatina, dejar hidratar por 5 minutos, luego colocar el bowl sobre una olla con agua caliente y mover hasta disolver bien la gelatina, añadir la glucosa y la glicerina, revolver bien hasta que se disuelva todo, retirar el bowl de la olla y agregar la esencia, dejar enfriar un poco, en un bowl aparte debes pasar por colador el azucar pulverizada, apartar en otro bowl alrededor de 2 tazas, cuando ya la mezcla de la gelatina este basante tibia casi a temperatura ambiente colocala en el medio del bowl que tenga mas azucar, empieza a integrar con una espatula hasta conseguir un punto en el que puedas manejarlo con la mano e ir integrando el azucar que tienes en el bowl y poco a poco ir agrgando las otras dos tazas que apartaste hasta conseguir una masa segun el clima puede necesitar mas azucar o menos, al pellizcar la masa entre los dedos no debe sentirse pegajosa ese es el punto perfecto, envolverla en plastico o dentro de la misma bolsa del azucar sin dejar entrar aire, la cierras bien y puedes usarla al dia siguiente, no se guarda en nevera, se mantiene afuera lejos del calor y humedad, bien cerrada, para estirar debes amasar nuevamente, preparar la mesa con cornstarch o azucar pulverizada, colocar en el centro y empezar a estirar con rodillo desde el medio hacia los lados segun sea el tamaño y forma de la torta, manten siempre con azucar pulverizada la superficia de la masa y el rodillo para que no se pegue
I got them at Toys R Us.
I enjoyed cake ttseas at OMSI afterhours last night, and have just looked over your website. love the Angry Birds, we’ll be calling you. now I wonder, where did you move FROM? I see it was just over a year ago that you announced that news.glad you are in town. Barbara
Very courageous of you to put up the disaster story and very creative of you to put up an adorable cake after a meltdown.. Those meltdowns could really make u feel dejected. Thumbs up!
Wow that was odd. I just wrote an really long comment
but after I clicked submit my comment didn’t appear.
Grrrr… well I’m not writing all that over again.
Regardless, just wanted to say superb blog!
アグ 通販 楽天 海外